

15. Seam
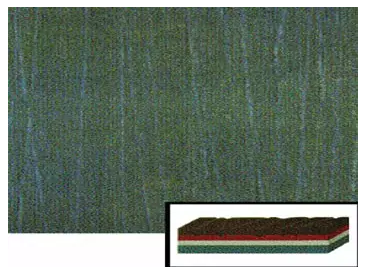
There is obvious seam penetration on the surface of the finishing coat, and the seams are parallel to each other. They are most common on black or other dark-colored paint surfaces.
(1) Causes
① Too coarse sandpaper is used in surface treatment. It is the correct way to use finer sandpaper than that used in the last polishing in every polishing.
② Improper use of diluent and too strong solubility. The diluent that is suitable for the paint should be used.
③ The old paint surface or the previous repaired surface is not fully processed and the original seams have not been removed, so the phenomenon often occurs when spraying new paint layer on the original cracked paint layer. Therefore, the area that needs to be repaired should be cleaned thoroughly when the paint is repaired.
(2) Correction method
Use the correct middle coating and finishing coat for the old paint and substrates. If seams appear, use fine sandpaper to smooth the surface, expose the undercoat and respray it with the correct diluent.
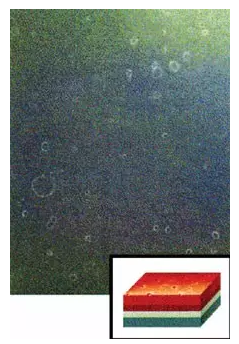
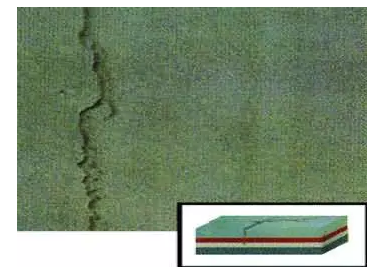
16. Tiny crazing
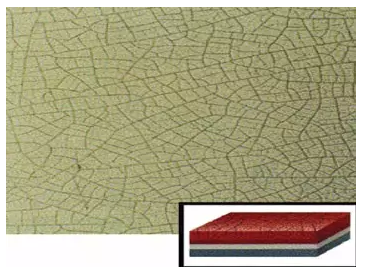
The paint surface is severely tarnished with a lot of tiny crazing. The crazing is similar to the cracks in the soil in a dry pond. The crazing often appears triangular, star-shaped or irregularly radiating. The crazing usually occurs on the finishing coat, but sometimes it penetrates into the undercoat.
(1) Causes
① The paint layer is too thick. Excessive thickness of the finishing coat will amplify the normal stress, resulting in cracking. Thinner coating and multiple spraying should be adopted to avoid the problem, and enough drying time should be set aside between the paint spraying operations of each layer. Do not dry it with a spray gun.
② The wrong additive is used. Carefully read and strictly abide the regulations on the paint label. The various non-top coat additives will damage the final paint layer and make the paint more prone to crack.
(2) Correction method
If the seam cannot be removed by polishing, the cracked part should be polished thoroughly. In severe cases, the paint layer should be removed until the metal layer is exposed and then respray it.
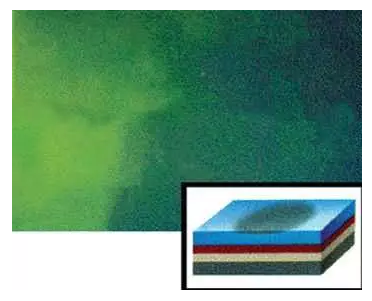
17. Fisheye
Fisheye is also known as shrinkage cavity or bead cavity. Round small pits appear on the finishing coat. They are sometimes dispersed and sometimes aggregated.
(1) Causes
① The wax containing silicone is the most common cause of fisheye. Silicone is found in abrasive materials on sandpaper, many car waxes and polishing agents. Silicone has a strong adhesion to the paint surface and is difficult to remove. A small amount of car wax can lead to fisheye, so make sure that all operations that need to contact with silicone are completed in an isolated workshop away from the paint shop.
② Primer surface pollution. For example, there is oil on the primer. The spraying surface must be cleaned with neutral cleaner before spraying.
③ The compressed air used for the spray gun should be strictly filtered to ensure the purity, because silicone is often found from the compressed air pipe rather than paint. The compressed air filter shall be emptied and cleaned every day to discharge the moisture and dirt. The air compressor shall be drained every day.
④ It is not recommended to use color paint containing anti-fisheye remover, because the remover may contaminate other spraying parts around and even lead to adhesion decrease of the finishing coat.
(2) Correction method
Remove the affected area and respray it.
18. Silking
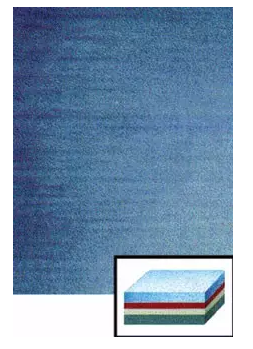
That is, the aluminium powder reflects light unevenly. The aluminium powder particles are arranged in the same direction, showing the stripes of light and dark. If the silking occurs on the vertical surface, the deposited aluminium powder will pierce the film in most cases.
(1) Causes
① Aluminium paint is mixed of pigment, solvent, metal particles of a certain size and additives, and the distribution ratio of metal particles in the pigment will affect the color of the paint. If the aluminium paint is not stirred evenly before spraying, the metal particles will deposit on the bottom of the container, resulting in too many metal particles in the bottom paint, so that the paint film will be over thick and the color of the paint surface will not be uniform.
② The viscosity of the paint is not correct, that is, there is something wrong with the proportion of the diluent. Excessive amount of diluent leads to a slow drying speed of the paint surface, and metal particles are easy to gather, so the silking is prone to occur. However, if the amount of diluent is too small, the film quality will be poor. An appropriate viscosity must be selected to accommodate both requirements
③ The time interval of each spraying is too short. If the aluminium paint is not completely dried, the metal particles will be unevenly distributed.
④ Improper adjustment of the spray gun or poor spray paint technology. If the compressed air pressure is too low, or the distance between the spray gun and the spray surface is too close, or the moving speed of the spray gun is not uniform, alternately dark and bright phenomenon will occur on the aluminium paint surface.
(2) Correction method
Respray the paint surface after wet polishing with fine sandpaper, or increase the compressed air pressure after the paint surface is completely dried. Increase the distance between the spray gun and the sprayed surface to 40-50cm, and then spray a layer of aluminium paint which uses quick drying diluent.
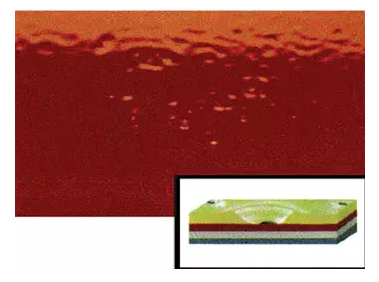
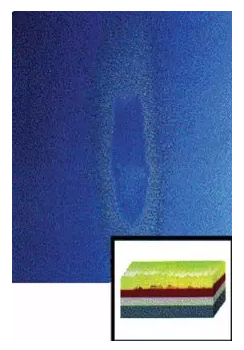
19. Water stain
White or yellow corroded spots appear on the surface of the paint layer, mostly on the car roof, engine hood, trunk deck and other surfaces perpendicular to the sunlight.
(1) Causes
①When the paint layer is not fully dry, it contacts with water droplets, especially the water with high mineral content. Water droplets mix with solvents in the paint and seep into the surface, leaving water stains. Therefore, the freshly sprayed paint surface is strictly prohibited from contacting with water, and the freshly sprayed cars are strictly prohibited from driving on rainy days.
The frequent contact with water droplets can make water stains leave even on dry surface. When exposed to sunlight, the droplets have the transmission focusing function of a magnifying glass, so the droplets will leave a corroded white or yellow outline on the paint surface after drying.
③ If the paint surface is too thick, it will extend the drying time, and the probability of water stains is higher after the paint surface contacts with water droplets.
④ The freshly sprayed paint surface uses silicon-based polishing materials too early.
(2) Correction method
If a thick wax layer is suspected on the paint surface, the paint should be thoroughly cleaned with solvent before polishing. The fineness of the polishing agent depends on the depth of the water stains. In particularly severe cases, the stains will reappear again after a few days of polishing. The cleaning and polishing process should be repeated several times to completely eliminate the water stains. If repeated polishing does not work, polish the water stain area with fine sandpaper and then respray it.
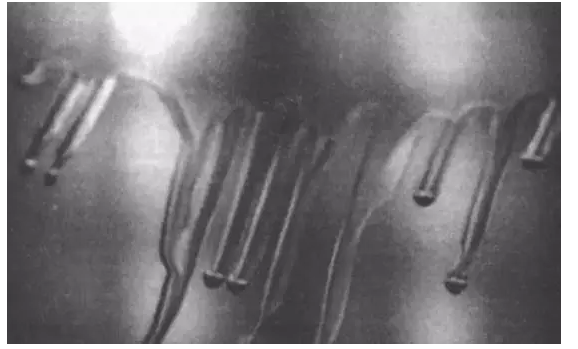
20. Sagging
Sagging is also known as tearing or vertical flow. The coating is locally thickened and the vertical flow occurs due to the gravity. The phenomenon only occurs when the painted surface is placed vertically or when the painted surface is vertically sprayed.
(1) Causes
① The diluent was used incorrectly. Diluents that dry slowly are used or excessive diluents are used.
② Improper use of the spray gun. If the compressed air pressure is too low, or the distance between the spray gun and the sprayed surface is too close, or the moving speed of the spray gun is too slow, the possibility of sagging phenomenon will increase. The shape and pressure of the spray jets should be adjusted properly to keep the spray distance between 20 and 25 cm, and the moving speed of the spray gun should be uniform. Control the spray amount limit that produces the sagging, and pay attention to observe the formation of paint film while spraying.
③Too low temperature of the spraying workshop will make the sprayed paint layer difficult to dry, or the paint layer is too thick in one-time spraying, resulting in the paint layer dries too slow.
④ Enough drying time should be set aside for the previous sprayed paint layer before spraying subsequent paint layers. Allow enough standing and leveling time for the paint layer before placing the sprayed surface vertically.
(2) Correction method
In mild sagging cases, carry out wet polishing on the defective area with fine sandpaper first after the surface is dry, then polish it with wax. If the sagging phenomenon is serious, the defective area shall be resprayed after polishing.
21. Bulge
The bulge is also called floating wrinkle. In the process of spraying or film drying, bulges form in a some areas due to the swelling of the paint surface, and the bulges may take on different shapes.
(1) Causes
① The wrong diluent was used. The use of volatile paint diluent in enamels promotes the formation of bulges in the internal paint layer, resulting in the bulge of the finishing coat layer.
②Incompatible materials are used. The newly sprayed paint layer has chemical reaction with the original paint layer, or the defects of the original paint layer have not been properly handled, then the separation between the paint layers causes the bulge of the finishing coat layer.
③The bottom surface has not been thoroughly cleaned. For example, the oil or wax on the bottom surface is not completely removed, and due to the interlayer effect, the resprayed paint cannot adhere to the bottom surface.
④ The interval time between the first spraying and secondary spraying is too short and the drying time of the primer is insufficient, causing the solvent in the wet paint to erode the primer or finishing coat and make them soft.
(2) Correction method
Polish the defective area until it is smooth but don’t wear it out, then respray it.
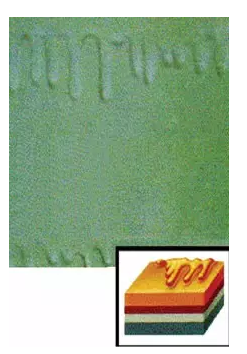
22. Crawling
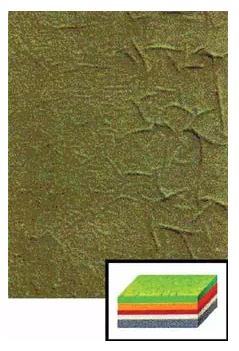
In the process of spraying or film drying, wrinkles or shrinkage deformation appear on the surface of the finishing coat. It is the most common defect in alkyd paint repair work.
(1) Causes
① Improper drying methods lead to uneven paint drying. If the freshly sprayed paint layer is dried or forced to dry too quickly, or the temperature in the paint workshop is too high, the surface paint will dry faster and shrink, which will delay the drying seed of the undercoat. When the undercoat dries, the surface paint will shrink. Therefore, painting in workshops where the temperature is inappropriate or where the temperature varies greatly should be avoided.
② The paint layer is too thick or too wet. The undercoat and outer paint can not release solvent or dry at the same speed if the paint layer is too thick or too wet, then the deformation and wrinkles will appear on the paint surface. Multiple spraying should be used to reduce the thickness of one-time sprayed finishing coat.
③The use of the wrong diluent or incompatible material. The use of quick drying diluent or volatile paint diluent in enamels can cause crawling. Quick drying diluent must be used in accordance with the regulations, and the amount of quick drying diluent should be reduced in the high temperature season.
(2) Correction method
After the paint is fully dried, remove the crawling paint surface and respray it.
23. Putty bleeding
After the finishing coat is sprayed, the surface color changes in the area where the putty has been used, and the color of the area usually appears lighter than the surrounding color. This phenomenon particularly occurs in light blue and light green aluminium paint primer.
(1) Causes
① There is too much curing agent in putty. The oxide in curing agent bleaches the pigment, which leads to uneven color.
② The quality of putty is poor.
(2) Correction method
① Adopt high quality putty, and mix the proportion of putty and curing agent correctly according to the usage instructions of putty.
② If the bleeding has occurred, the surface paint layer should be polished and resprayed. In severe cases, the putty coating should be polished off and repaired again.
24. Rime fog
Rime fog is also known as fogging or matt surface. A milky and fuzzy appearance will appear on the surface of the paint layer shortly after or during the spraying process. This phenomenon is only seen on single-component acrylic varnish films.
(1) Causes
①The appearance of rime fog is often associated with bad weather. In high temperature or cold wet weather, the solvent in the paint volatilizes rapidly, which will cause the temperature decrease of the paint layer surface. At this point the moisture in the air condenses on the surface of the paint, resulting in rime fog. Rime fog can also be caused by the use of poor quality diluent, the cold weather, too fast air flow or spot repair.
②Use the wrong diluent. The use of rapid evaporation diluent will make the thick paint film cool excessively, which will make the moisture in air condense on the paint surface.
③ Improper adjustment of the spray gun or compressed air. If the compressed air pressure is too high, the cooling phenomenon will occur on the wet paint surface, so that the speed of moisture condensation will increase.
④Improper drying. Drying the paint surface forcibly with a spray gun will increase the evaporation speed of the diluent in the paint film and result in the moisture condensation.
(2) Correction method
Respray it in aproper working environment.
25. The expansion of sandpaper traces

There are obvious sandpaper traces on the paint surface.
(1) Causes
① After the bottom layer is polished with coarse sandpaper, the sandpaper traces are not filled with putty or primer.
② The use of inappropriate diluent or improper diluent proportion will make the diluent in the freshly sprayed finishing coat seep into the old paint layer, resulting in the expansion of sandpaper traces.
(2) Correction method
Smooth the sandpaper traces by dry or wet polishing method, then apply the putty and spray the primer and finishing coat.
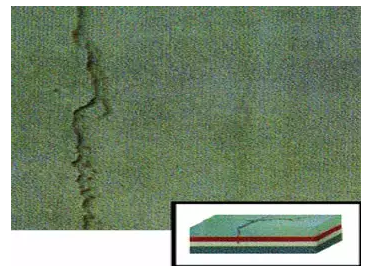
26. The crack of putty or middle coating
In the paint repair area, the crack of the area filled with putty or the primer results in the crack of the finishing coat.
(1) Causes
① The putty layer or the middle coating is too thick and the drying time between each layer is not sufficient, so that the surface of the putty layer or the middle coating is dry but the bottom layer is soft, then the crack of the putty layer or the middle coating happens. Therefore, multiple thin layer spraying should be taken in putty blade coating or primer spraying, and enough drying time should be set aside according to the climate conditions.
② The insufficient treatment of the transition area between the putty or middle coating and the old paint layer, that is, around the pinnate edge results in the crack of the putty coating due to the untight binding. No. 600 sandpaper should be used to prevent the solvent from entering the lower deep scratching layer.

 English
 한국어
한국어 français
 Deutsch
 Español
 italiano
 русский
 português
 العربية
 tiếng việt
 Polska